77th JSOC / Public Servers / Guidelines: Difference between revisions
No edit summary |
No edit summary |
||
| (7 intermediate revisions by one other user not shown) | |||
| Line 11: | Line 11: | ||
we've established on our servers. | we've established on our servers. | ||
If you are interested in the private aspect of our unit take a look around when we have recruitment open and | If you are interested in the private aspect of our unit take a look around when we have recruitment open and | ||
join us on multiple custom written operations and missions. | join us on multiple custom-written operations and missions. | ||
</p> | </p> | ||
| Line 21: | Line 21: | ||
<p class="guidelines"> | <p class="guidelines"> | ||
The first thing one should do when first joining the server is | The first thing one should do when first joining the server is to get your loadout fixed.<br> | ||
We highly recommend spending some time going over what items you want to take into the battlefield. <br> | We highly recommend spending some time going over what items you want to take into the battlefield. <br> | ||
Keep it specific to the role you are playing. | Keep it specific to the role you are playing. | ||
| Line 29: | Line 29: | ||
If you do not know what accessories are fit for your role we advise you to have a look at the [http://www.77th-jsoc.com/wiki1/77th_JSOC_/_Public_Servers_/_Guides role guide section] first.<br> | If you do not know what accessories are fit for your role we advise you to have a look at the [http://www.77th-jsoc.com/wiki1/77th_JSOC_/_Public_Servers_/_Guides role guide section] first.<br> | ||
You will be able to find a recommended loadout for every role available. We appreciate it if you keep it as realistic as possible, which will add a lot to the gameplay itself. <br> | You will be able to find a recommended loadout for every role available. We appreciate it if you keep it as realistic as possible, which will add a lot to the gameplay itself. <br> | ||
All arsenals at base will provide a standard loadout for all classes available on the server. Depending on the slot you selected when joining the server you will be able to pick the green class name corresponding to your role in the arsenal. This will automatically equip a loadout suitable for your role. </p> | All arsenals at the base will provide a standard loadout for all classes available on the server. Depending on the slot you selected when joining the server you will be able to pick the green class name corresponding to your role in the arsenal. This will automatically equip a loadout suitable for your role. </p> | ||
<p class="guidelines"> | <p class="guidelines"> | ||
| Line 57: | Line 57: | ||
<p class="guidelines"> | <p class="guidelines"> | ||
When there is no HQ on the server, wait at the assignment sign until a pilot finds the time to assign you to a squad or give you a squad name. <br/> | When there is no HQ on the server, wait at the assignment sign until a pilot finds the time to assign you to a squad or give you a squad name. <br/> | ||
Know that being | Know that being proactive will get you to the battlefield a lot quicker than just passively waiting at the base, pilots or HQ may be busy, so just remind them that you need a squad or want to create one. | ||
</p> | </p> | ||
<p class="guidelines"> | <p class="guidelines"> | ||
Once you are assigned to a squad, there are two options to join it:<br/> | Once you are assigned to a squad, there are two options to join it:<br/> | ||
1: You either will receive an invitation from the squad leader. <br/> (When you receive an invitation, a pop-up will appear on your screen with the name of the person who invited you and | 1: You either will receive an invitation from the squad leader. <br/> (When you receive an invitation, a pop-up will appear on your screen with the name of the person who invited you and asks you to press and hold 'U' to accept the invitation).<br/> | ||
2: You can join an open squad yourself.<br/> | 2: You can join an open squad yourself.<br/> | ||
(To manually join a squad you need to open the squad menu by pressing the "U" key and then manually select and press join for the squad you are assigned to). | (To manually join a squad you need to open the squad menu by pressing the "U" key and then manually select and press join for the squad you are assigned to). | ||
| Line 68: | Line 68: | ||
<p class="guidelines"> | <p class="guidelines"> | ||
If you are creating a new squad, open your squad manager system (SMS) by pressing 'U' and | If you are creating a new squad, open your squad manager system (SMS) by pressing 'U' and creating a new squad. You may then invite the players assigned to your squad via the same system. | ||
</p> | </p> | ||
<p class="guidelines"> | |||
Once you are part of a squad or leading a squad, line up at your squad's sign at the base. (The small signs with Alpha to Hotel on them). | |||
</p> | |||
[http://www.77th-jsoc.com/wiki1/77th_JSOC_/_Public_Servers_/_Guidelines back to top] | |||
<hr> | |||
<h3 class="guidelines">Getting deployed to the AO</h3> | |||
<p class="guidelines"> | |||
Once you are part of a squad and have lined up at the correct squad sign it's time to get yourself into the action and get deployed to the AO. <br> | |||
To do this will differ depending on what situation you are in and what role you have in your squad. <br> | |||
</p> | |||
<p class="guidelines"> | |||
If you are the squad leader of your squad, you need to use the command channel and call for transport from HQ/Pilots, state what squad you are and how many members you have that need a lift and where you | |||
want to go. <br> | |||
HQ/Pilots will then organize the necessary transport and tell you what asset you are assigned for the transport to the AO. | |||
</p> | |||
<p class="guidelines"> | |||
If you are a squad member and your squad is at the base, line up at the squad sign with your fellow squad mates and wait for your Squad leader to arrange a lift for you out to the AO. <br> | |||
When transport is arranged, your Squad leader will tell you where to go for transport to the AO. | |||
</p> | |||
<p class="guidelines"> | |||
If you are a squad member and your squad is already deployed to the AO, line up at your squad sign and inform your Squad leader that you are awaiting transport to their location. <br> | |||
Your Squad lead will then contact HQ/Pilots and arrange a lift for you to the AO, when this is done, your Squad leader will tell you to what asset you are to head for transport to the AO. | |||
</p> | |||
[http://www.77th-jsoc.com/wiki1/77th_JSOC_/_Public_Servers_/_Guidelines back to top] | [http://www.77th-jsoc.com/wiki1/77th_JSOC_/_Public_Servers_/_Guidelines back to top] | ||
| Line 78: | Line 110: | ||
<h3 class="guidelines">Squad sizes</h3> | <h3 class="guidelines">Squad sizes</h3> | ||
<p class="guidelines"> | <p class="guidelines"> | ||
First of all, we should make a clear distinction | First of all, we should make a clear distinction between different types of squads. There is a difference between an infantry squad, mortar squad or armor crew. Those minimum requirements have to be met and respected in order to be deployed. | ||
</p> | </p> | ||
<ul class="guidelines"> | <ul class="guidelines"> | ||
| Line 86: | Line 118: | ||
</ul> | </ul> | ||
<p class="guidelines"> | <p class="guidelines"> | ||
An infantry squad consists of a bare minimum of six players. A squad always | An infantry squad consists of a bare minimum of six players. A squad always needs a squad leader, in addition to this it is highly recommended that there is one medic and one anti-tank rifleman in order to be effective. The remaining three roles can be adjusted to the needs of the mission at hand. | ||
</p> | </p> | ||
<ul class="guidelines"> | <ul class="guidelines"> | ||
| Line 94: | Line 126: | ||
</ul> | </ul> | ||
<p class="guidelines"> | <p class="guidelines"> | ||
An | An armor crew consists of three players in order to be functional. The roles consist of a squad leader who will be in the commanding seat issuing the orders, a driver and a gunner. Either the driver or the gunner should preferably have the role of an engineer in order to salvage the vehicle if it gets damaged by the enemy. Be advised, an armor squad can only be granted by an acting HQ. | ||
</p> | </p> | ||
<ul class="guidelines"> | <ul class="guidelines"> | ||
| Line 102: | Line 134: | ||
</ul> | </ul> | ||
<p class="guidelines"> | <p class="guidelines"> | ||
Before deploying to the AO, a squad wishing to use Mortars | Before deploying to the AO, a squad wishing to use Mortars needs to ask for permission from HQ. Without HQ, mortars are not allowed to be deployed.<br/> | ||
A mortar team | A mortar team has the same squad size requirement as any other infantry squad. Contrary to popular belief, a mortar squad does not standardly operate with a vehicle, they are foot mobile. <br/> | ||
A mortar unit will be regarded as artillery and falls under the same ROE as the base artillery. <br/> | A mortar unit will be regarded as artillery and falls under the same ROE as the base artillery. <br/> | ||
By default, a mortar squad should include one squad leader, one mortar gunner, and two carriers who also perform perimeter security. It is up to the squad leader to decide if there is any rotation whilst holding the position. | By default, a mortar squad should include one squad leader, one mortar gunner, and two carriers who also perform perimeter security. It is up to the squad leader to decide if there is any rotation whilst holding the position. | ||
| Line 113: | Line 145: | ||
<p class="guidelines"> | <p class="guidelines"> | ||
Communication is key, not only in battle but also when you find yourself at base. To ensure proper communications | Communication is key, not only in battle but also when you find yourself at the base. To ensure proper communications | ||
we have set up standards we expect all players to uphold. In general, every player is allowed to use all the | we have set up standards we expect all players to uphold. In general, every player is allowed to use all the | ||
different channels to chat (i.e: using side to find a squad). However, we would appreciate it if you keep it to the | different channels to chat (i.e.: using side to find a squad). However, we would appreciate it if you keep it to the | ||
point. For voice transmissions (VOIP) we have the following standards and rules set up. | point. For voice transmissions (VOIP) we have the following standards and rules set up. | ||
</p> | </p> | ||
| Line 125: | Line 157: | ||
</ul> | </ul> | ||
<p class="guidelines"> | <p class="guidelines"> | ||
When used for voice communications this channel is reserved for 77th | When used for voice communications this channel is reserved for 77th JSOC members or the person who is acting as HQ. Since transmitting over the side | ||
channel gets broadcasted for every player on the server we strongly advocate the HQ to | channel gets broadcasted for every player on the server we strongly advocate the HQ to minimize the chatter on this | ||
channel refrain from using it unless deemed necessary. Any player abusing this might be removed from the server after | channel and refrain from using it unless deemed necessary. Any player abusing this might be removed from the server after | ||
repeated infractions. | repeated infractions. | ||
The side channel is a good place to type questions regarding the servers/gameplay as anyone logged on to the server | The side channel is a good place to type questions regarding the servers/gameplay as anyone logged on to the server is able to see the question and answer. | ||
</p> | </p> | ||
| Line 139: | Line 171: | ||
<p class="guidelines"> | <p class="guidelines"> | ||
This channel is used by the players who are either HQ, pilots, UAV-operator or squad leaders. Its sole purpose is to | This channel is used by the players who are either HQ, pilots, UAV-operator or squad leaders. Its sole purpose is to | ||
effectively communicate | effectively communicate between the several layers of command and to request insertions, extractions, CAS strikes | ||
and the like. | and the like. | ||
</p> | </p> | ||
| Line 159: | Line 191: | ||
</ul> | </ul> | ||
<p class="guidelines"> | <p class="guidelines"> | ||
It is good practice to switch to vehicle channel whenever you are mounting one. This channel permits you to communicate with all others within the same vehicle. This can come in handy when you want to communicate with a driver or a transport pilot. | It is good practice to switch to a vehicle channel whenever you are mounting one. This channel permits you to communicate with all others within the same vehicle. This can come in handy when you want to communicate with a driver or a transport pilot. | ||
</p><ul class="guidelines"> | </p><ul class="guidelines"> | ||
<li> | <li> | ||
| Line 166: | Line 198: | ||
</ul> | </ul> | ||
<p class="guidelines"> | <p class="guidelines"> | ||
Lastly, the direct channel will mostly be used at the base or when you want to communicate with another squad nearby | Lastly, the direct channel will mostly be used at the base or when you want to communicate with another squad nearby on the | ||
battlefield itself. This is the least powerful channel and the further away you are from the person you are talking | battlefield itself. This is the least powerful channel and the further away you are from the person you are talking | ||
to, the weaker the sound will get. At base, it is frequently used to recruit personnel to join squads. | to, the weaker the sound will get. At base, it is frequently used to recruit personnel to join squads. | ||
| Line 176: | Line 208: | ||
<ul> | <ul> | ||
<li>When sending a message over the command channel, the sender should always start with identifying the | <li>When sending a message over the command channel, the sender should always start with identifying the receiver followed by their own identity</li> | ||
<li>To reduce radio | <li>To reduce radio traffic, all voice communications should be as short as possible</li> | ||
<li>Voice | <li>Voice communications should always be to the point and have a clear message that is easy to understand by the receiver</li> | ||
<li>Communication procedure: [Request] –> [Contact] -> [Message] -> [Ending]</li> | <li>Communication procedure: [Request] –> [Contact] -> [Message] -> [Ending]</li> | ||
<li>Keep all channels clean for | <li>Keep all channels clean for good communication between players.</li> | ||
<li>Only one person can speak on command channel at a time.</li> | <li>Only one person can speak on the command channel at a time.</li> | ||
<li>You can request communication with all elements on the command channel.</li> | <li>You can request communication with all elements on the command channel.</li> | ||
<li> The end of channel use should always be clear for other elements.</li> | <li> The end of channel use should always be clear for other elements.</li> | ||
| Line 196: | Line 228: | ||
<p class="guidelines"> | <p class="guidelines"> | ||
Personnel who place mines near the extraction site risk being removed from the servers as there is no viable reason to do so after all threats have been eliminated. If one does and damages the extraction vehicle that person will be temporarily removed from the game for a set amount of time from all our services. We do not tolerate any form of | Personnel who place mines near the extraction site risk being removed from the servers as there is no viable reason to do so after all threats have been eliminated. If one does and damages the extraction vehicle that person will be temporarily removed from the game for a set amount of time from all our services. We do not tolerate any form of damage to NATO equipment. | ||
</p> | </p> | ||
[http://www.77th-jsoc.com/wiki1/77th_JSOC_/_Public_Servers_/_Guidelines back to top] | [http://www.77th-jsoc.com/wiki1/77th_JSOC_/_Public_Servers_/_Guidelines back to top] | ||
| Line 204: | Line 236: | ||
<p class="guidelines"> | <p class="guidelines"> | ||
In order to have a more realistic and immersive experience, we expect following guidelines to be respected:<br/> | In order to have a more realistic and immersive experience, we expect the following guidelines to be respected:<br/> | ||
*Only the squad leader is allowed to carry blue smoke. This | *Only the squad leader is allowed to carry blue smoke. This color will be used for extraction purposes only. <br/> | ||
*All other members are allowed to use either green, red or white smoke.<br/> | *All other members are allowed to use either green, red or white smoke.<br/> | ||
*If red smoke gets purposely thrown on friendly units the person having thrown that smoke risks getting removed from our servers. | *If red smoke gets purposely thrown on friendly units the person having thrown that smoke risks getting removed from our servers. | ||
| Line 217: | Line 249: | ||
</li> | </li> | ||
<li> | <li> | ||
<p class="guidelines"><em class="smoke" style="color: gray;">White smoke</em> : Used to cover visual line of sight to either get in cover safely or retrieve downed members</p> | <p class="guidelines"><em class="smoke" style="color: gray;">White smoke</em> : Used to cover a visual line of sight to either get in cover safely or retrieve downed members</p> | ||
</li> | </li> | ||
<li> | <li> | ||
| Line 230: | Line 262: | ||
<hr> | <hr> | ||
<h2 class=" | <h2 class="guidelines">Basic formations</h2> | ||
<p class=" | <p class="guidelines"> | ||
<em style="font-weight:bold;">Formation</em> - A formation is defined as an arrangement. | <em style="font-weight:bold;">Formation</em> - A formation is defined as an arrangement. | ||
The way something, in this case members of a squad, are arranged or coming together. | The way something, in this case, members of a squad, are arranged or coming together. | ||
The | The end goal of keeping formations lies in working together as a single entity, providing cover and keeping sectors | ||
cleared so the integrity of the unit can be guaranteed. | cleared so the integrity of the unit can be guaranteed. | ||
</p> | </p> | ||
<h3 class=" | <h3 class="guidelines">Column</h3> | ||
http://www.77th-jsoc.com/wiki1/images/column.jpg | http://www.77th-jsoc.com/wiki1/images/column.jpg | ||
<p class=" | <p class="guidelines"> | ||
A column is frequently used in non-combat situations when moving towards a set point over the mainland. | A column is frequently used in non-combat situations when moving towards a set point over the mainland. | ||
Whilst this formation is one of the most frequently used, goal of it gets misused even more. | Whilst this formation is one of the most frequently used, goal of it gets misused even more. | ||
If one wants to make optimal use of this formation it is of the | If one wants to make optimal use of this formation it is of the utmost importance to keep sectors. | ||
</p> | </p> | ||
<p class=" | <p class="guidelines"> | ||
The first person in line always keeps the sector right in front while navigating towards the objective. | The first person in line always keeps the sector right in front while navigating towards the objective. | ||
The second person chooses and | The second person chooses and vocalizes whether he is taking the left or right side relative to the person in front. | ||
All soldiers who follow will take the opposite side of the person in front of him, while ultimately the last person | All soldiers who follow will take the opposite side of the person in front of him, while ultimately the last person | ||
checks the rear from time to time to make sure | checks the rear from time to time to make sure no one can creep up behind. | ||
</p> | </p> | ||
<h3 class=" | <h3 class="guidelines">Staggered Column</h3> | ||
http://www.77th-jsoc.com/wiki1/images/staggered-column.jpg | http://www.77th-jsoc.com/wiki1/images/staggered-column.jpg | ||
<p class=" | <p class="guidelines"> | ||
A staggered column is frequently used in non-combat situations when moving towards a set point in urban areas or | A staggered column is frequently used in non-combat situations when moving towards a set point in urban areas or | ||
along main roads. This will also be used when escorting vehicles towards a set | along main roads. This will also be used when escorting vehicles towards a set objective, having the vehicle drive between both | ||
columns. | columns. | ||
</p> | </p> | ||
<p class=" | <p class="guidelines"> | ||
Moving as two | Moving as two separate staggered columns, the leftmost column will keep the left sector clear while the rightmost | ||
column keeps the right sector clear. Just | column keeps the right sector clear. Just like a normal column, the persons in the back of the formation keep check of the rear so | ||
no enemies can creep up on them. | no enemies can creep up on them. | ||
</p> | </p> | ||
<h3 class=" | <h3 class="guidelines">Wedge</h3> | ||
http://www.77th-jsoc.com/wiki1/images/wedge.jpg | http://www.77th-jsoc.com/wiki1/images/wedge.jpg | ||
<p class=" | <p class="guidelines"> | ||
The wedge or arrow formation is commonly used when moving through an open field while under fire or when starting an | The wedge or arrow formation is commonly used when moving through an open field while under fire or when starting an | ||
assault from an elevated position | assault from an elevated position toward a set objective. This formation provides when used correctly almost 180° coverage | ||
in the direction you are moving. Just as all other formations the last person makes sure the rear end stays clear from enemies. | in the direction you are moving. Just as in all other formations the last person makes sure the rear end stays clear from enemies. | ||
</p> | </p> | ||
<h3 class=" | <h3 class="guidelines">Echelon</h3> | ||
http://www.77th-jsoc.com/wiki1/images/echelon.jpg | http://www.77th-jsoc.com/wiki1/images/echelon.jpg | ||
<p class=" | <p class="guidelines"> | ||
Echelon or staircase formation is most frequently used on steep terrain | Echelon or staircase formation is most frequently used on steep terrain differences like moving up a mountain in | ||
which the use of other formations | which the use of other formations is inefficient. It is in essence the leftmost or rightmost half of a wedge. Where sectors are | ||
being kept | being kept on par with the wedge formation. | ||
</p> | </p> | ||
<h3 class=" | <h3 class="guidelines">Diamond</h3> | ||
http://www.77th-jsoc.com/wiki1/images/diamond.jpg | http://www.77th-jsoc.com/wiki1/images/diamond.jpg | ||
<p class=" | <p class="guidelines"> | ||
The | The Diamond formation is often used when escorting a high-value target(HVT). This formation is less frequently used, | ||
but when used correctly it will provide 360° coverage. Each member covers the sector relative to his position within the diamond. | but when used correctly it will provide 360° coverage. Each member covers the sector relative to his position within the diamond. | ||
</p> | </p> | ||
<h3 class=" | <h3 class="guidelines">Line</h3> | ||
http://www.77th-jsoc.com/wiki1/images/line.jpg | http://www.77th-jsoc.com/wiki1/images/line.jpg | ||
<p class=" | <p class="guidelines"> | ||
A line or walking line formation is either used when | A line or walking line formation is either used when suppressing fire from an elevated position or when you need | ||
maximum firepower in one direction. Also proven handy to sweep areas of dense cover. The main | maximum firepower in one direction. Also proven handy to sweep areas of dense cover. The main responsibility of the soldiers on the | ||
outer flanks is to prevent enemies from flanking or creeping up behind the squad. | outer flanks is to prevent enemies from flanking or creeping up behind the squad. | ||
</p> | </p> | ||
| Line 303: | Line 335: | ||
<hr> | <hr> | ||
<h2 class=" | <h2 class="guidelines">Combat movement</h2> | ||
<p class=" | <p class="guidelines"> | ||
Combat tactics when moving towards an objective or when retreating from hot areas to provide a maximum amount of | Combat tactics when moving towards an objective or when retreating from hot areas to provide a maximum amount of | ||
safety and therefore | safety and therefore ensure a minimum amount of casualties whilst being on the move. | ||
</p> | </p> | ||
<h3 class=" | <h3 class="guidelines">Bounding</h3> | ||
<p class=" | <p class="guidelines"> | ||
The bounding tactic is a combat | The bounding tactic is a combat maneuver frequently used to safely reach your objective when there is not much cover | ||
and when you want to keep | and when you want to keep maximum firepower at all times. | ||
</p> | </p> | ||
<p class=" | <p class="guidelines"> | ||
This tactic consists of one fireteam bounding to a certain point, once that fireteam is set, the second overwatching | This tactic consists of one fireteam bounding to a certain point, once that fireteam is set, the second overwatching | ||
fireteam 'bounds' up to the first fireteam's location. Which allows a maximum amount of firepower if troops come into contact | fireteam 'bounds' up to the first fireteam's location. Which allows a maximum amount of firepower if troops come into contact | ||
with enemies. This movement gets repeated | with enemies. This movement gets repeated until the full squad reaches its destination. | ||
</p> | </p> | ||
<h3 class=" | <h3 class="guidelines">Alternate Bounding a.k.a. Leapfrogging</h3> | ||
<p class=" | <p class="guidelines"> | ||
The tactic of alternating movement of coordinated units to allow, if necessary, suppressive fire in support of | The tactic of alternating movement of coordinated units to allow, if necessary, suppressive fire in support of | ||
offensive forward movement or defensive disengagement. | offensive forward movement or defensive disengagement. | ||
</p> | </p> | ||
<p class=" | <p class="guidelines"> | ||
In essence, a fireteam takes up an overwatch position whilst the other members advance to cover. These two fireteams | In essence, a fireteam takes up an overwatch position whilst the other members advance to cover. These two fireteams | ||
continuously switch roles | continuously switch roles toward their objective. This allows the overwatch position to suppress enemy fire when necessary. | ||
</p> | </p> | ||
<p class=" | <p class="guidelines"> | ||
The | The difference between normal bounding and leapfrogging lies in the fact that the leapfrogging tactic overtakes the | ||
overwatch position instead of halting at the overwatching fireteam. | overwatch position instead of halting at the overwatching fireteam. | ||
</p> | </p> | ||
| Line 342: | Line 374: | ||
<hr> | <hr> | ||
<h2 class=" | <h2 class="guidelines">Medical procedures</h2> | ||
<p class=" | <p class="guidelines"> | ||
Next to the | Next to the squad leader and fireteam lead the combat lifesaver (CLS) is the most important role a squad member can | ||
fulfill. Therefore it is imperative not to take big risks but rather stay behind the other members in order to provide | fulfill. Therefore it is imperative not to take big risks but rather stay behind the other members in order to provide | ||
medical assistance when someone gets injured or killed in action(KIA). It is a smart thing to task other members of the squad in | medical assistance when someone gets injured or killed in action(KIA). It is a smart thing to task other members of the squad in | ||
retrieving downed | retrieving downed members to safety so the CLS can do his job. | ||
</p> | </p> | ||
<p class=" | <p class="guidelines"> | ||
In light of keeping | In light of keeping tactical realism to a high standard, it is NOT allowed to respawn when one dies. When you | ||
decease on the battlefield it is imperative to let the timer run and give your | decease on the battlefield it is imperative to let the timer run and give your squad members the chance to drag or carry you into | ||
safety so the medic can | safety so the medic can perform his magic upon you, since briefly put, if you die, you must have done something wrong. Frequently, | ||
casualties are sustained when not being able to keep sectors, | casualties are sustained when not being able to keep sectors, letting enemies creep up on you, not using hard cover to your advantage | ||
and so on. Therefore we explicitly ask you NOT to respawn. | and so on. Therefore we explicitly ask you NOT to respawn. | ||
</p> | </p> | ||
<p class=" | <p class="guidelines"> | ||
Be advised that, if you however do respawn for whichever reason other | Be advised that, if you however do respawn for whichever reason other than disconnection, you will be demoted to the | ||
lowest priority to link back up to your squad. | lowest priority to link back up to your squad. This means, if pilots have other tasks at hand, they will stay at base until other | ||
tasks have been completed before getting reunited with | tasks have been completed before getting reunited with their squad on the battlefield. Unless you are the squad leader or medic there | ||
will be no exceptions made. | will be no exceptions made. | ||
</p> | </p> | ||
<p class=" | <p class="guidelines"> | ||
As a CLS it is essential to wait with performing medical assistance | As a CLS it is essential to wait with performing medical assistance until the casualty has been dragged and dropped | ||
completely, or, carried and touched the ground. When trying to revive while the animation is still being executed this can result in | completely, or, carried and touched the ground. When trying to revive while the animation is still being executed this can result in | ||
a | a so-called 'bugged' player. If you are experiencing a carry bug, the solution is: Press ESC --> Respawn (ONCE) --> Medic revive. There are NO legitimate reasons to kill a friendly. | ||
</p> | </p> | ||
[http://www.77th-jsoc.com/wiki1/77th_JSOC_/_Public_Servers_/_Guidelines back to top]<br> | [http://www.77th-jsoc.com/wiki1/77th_JSOC_/_Public_Servers_/_Guidelines back to top]<br> | ||
<hr> | <hr> | ||
<h2 class=" | <h2 class="guidelines">Clearing of buildings</h2> | ||
<p class=" | <p class="guidelines"> | ||
While this might be standard for most players, it is one of the deadliest | While this might be standard for most players, it is one of the deadliest maneuvers when not carried out correctly. | ||
When breaching any kind of building or structure it is imperative the breaching squad communicates clearly on each | When breaching any kind of building or structure it is imperative the breaching squad communicates clearly on each | ||
member's tasks. | |||
</p> | </p> | ||
<p class=" | <p class="guidelines"> | ||
While stacking up in anticipation of breaching it is a smart thing to reload a fresh magazine, make sure your | While stacking up in anticipation of breaching it is a smart thing to reload a fresh magazine, make sure your | ||
weapon's | weapon's fire rate is set to burst or automatic, keep on covering sectors to avoid getting flanked by roaming enemies and wait until | ||
all members are ready to breach. Whilst this seems like the most basic of things, missing out on one of previous measures can have | all members are ready to breach. Whilst this seems like the most basic of things, missing out on one of the previous measures can have | ||
catastrophic consequences for the whole team. | catastrophic consequences for the whole team. | ||
</p> | </p> | ||
< | |||
<h3 class="guidelines">The breaching process:</h3> | |||
While one member opens the door, the first man in or 'breacher' proceeds | <p class="guidelines"> | ||
While one member opens the door, the first man in or 'breacher' proceeds to move inside the structure neutralizing | |||
all enemy contacts in the frontal sector. The second soldier (who opened the door) immediately follows and calls out 'Clearing | all enemy contacts in the frontal sector. The second soldier (who opened the door) immediately follows and calls out 'Clearing | ||
left/right | left/right depending on that building's layout. The third member takes the opposite side for his account whilst vocalizing his sector. A | ||
fourth member will cover the entrance unless explicitly told otherwise by the person in charge. | fourth member will cover the entrance unless explicitly told otherwise by the person in charge. | ||
</p> | </p> | ||
| Line 399: | Line 432: | ||
<hr> | <hr> | ||
<h2 class=" | <h2 class="guidelines">Situational awareness</h2> | ||
<p class=" | <p class="guidelines"> | ||
Situational awareness is the perception of environmental elements with respect to time or space, the comprehension | Situational awareness is the perception of environmental elements with respect to time or space, the comprehension | ||
of their meaning and the projection of their status after some variable has changed. Or, in simpler words, being aware of what | of their meaning and the projection of their status after some variable has changed. Or, in simpler words, being aware of what | ||
happens in your surroundings and | happens in your surroundings and possessing the ability to adapt to unforeseen circumstances. | ||
</p> | </p> | ||
<p class=" | <p class="guidelines"> | ||
Situational awareness is a state that should always be kept regardless | Situational awareness is a state that should always be kept regardless of combat situation, even at base when | ||
waiting for a squad it might come in handy | waiting for a squad it might come in handy to understand what is going on on the servers at that moment in time. The HQ or pilots might | ||
be otherwise engaged at which point it makes no sense in pushing or pressuring people to prioritize | be otherwise engaged at which point it makes no sense in pushing or pressuring people to prioritize themselves over the overall | ||
situation at hand. | situation at hand. | ||
</p> | </p> | ||
<p class=" | <p class="guidelines"> | ||
Critical thinking helps out improving your situational awareness | Critical thinking helps out improving your situational awareness on the battlefield. | ||
Putting yourself in the | Putting yourself in the enemy's shoes and questioning if I were the enemy, where would I station myself? Where would | ||
I fire from? How can I flank the enemy without them spotting me | I fire from? How can I flank the enemy without them spotting me? These are basic examples that can help you raise your overall | ||
awareness. | awareness. | ||
</p> | </p> | ||
<p class=" | <p class="guidelines"> | ||
Keeping sectors at all times and being able to adapt to the evolving situation improves situational | |||
awareness | awareness as well. Knowing that, if you keep a sector that is not taking fire at that particular moment in time but your team member | ||
on the opposite side of your formation is, you don't need to change facing towards his sector unless explicitly told to do so. | on the opposite side of your formation is, you don't need to change facing towards his sector unless explicitly told to do so. | ||
If you do however change your sector you are weakening your formation and giving the enemy the opportunity to attack | If you do however change your sector you are weakening your formation and giving the enemy the opportunity to attack | ||
| Line 432: | Line 465: | ||
<hr> | <hr> | ||
<h2 class="guidelines"> | <h2 class="guidelines">Abbreviations and definitions</h2> | ||
<div class="guidelinesTables"> | <div class="guidelinesTables"> | ||
| Line 487: | Line 520: | ||
|- | |- | ||
!HQ | !HQ | ||
|Headquarters. The person in charge- takes control | |Headquarters. The person in charge- takes control of the logistics and resources | ||
|- | |- | ||
!JTAC | !JTAC | ||
| Line 505: | Line 538: | ||
|- | |- | ||
!Main AO | !Main AO | ||
|Main Area of Operations. | |Main Area of Operations. The big red circle on the map. | ||
|- | |- | ||
!MIA | !MIA | ||
| Line 535: | Line 568: | ||
|- | |- | ||
!Side Mission | !Side Mission | ||
|A smaller, alternative objective that | |A smaller, alternative objective that usually requires good coordination within the squad assigned to it. | ||
|- | |- | ||
!SL | !SL | ||
| Line 558: | Line 591: | ||
| style="vertical-align: top; padding-left: 15px;" | | | style="vertical-align: top; padding-left: 15px;" | | ||
{| class="wikitable" | {| class="wikitable" | ||
! colspan="4" | | ! colspan="4" | Phonetic Alphabet | ||
|- | |- | ||
! A | ! A | ||
| Line 631: | Line 664: | ||
<hr> | <hr> | ||
<h1 class="guidelines">Server | <h1 class="guidelines">Server Specific Systems</h1> | ||
<h2 class="guidelines">Squad Management System (SMS)</h2> | <h2 class="guidelines">Squad Management System (SMS)</h2> | ||
| Line 644: | Line 677: | ||
<p class="guidelines"> | <p class="guidelines"> | ||
Pressing 'U' without having received an invitation will open up the Squad Management System. This is a tool | Pressing 'U' without having received an invitation will open up the Squad Management System. This is a tool that displays all active squads, shows the personnel currently in it and shows you who is still squad-less or without a group. If you receive an invitation from a squad leader you can confirm that invitation by pressing and holding 'U'. | ||
</p> | </p> | ||
| Line 670: | Line 703: | ||
<h3 class="guidelines">Comm-Link</h3> | <h3 class="guidelines">Comm-Link</h3> | ||
<p class="guidelines"> | <p class="guidelines"> | ||
Through the Comm-Link button, players may access links to different 77th JSOC social media platforms, website, forums and donation links. <br> | |||
Players may also access the Group manager/Squad manager (SMS) as well | Players may also access the Group manager/Squad manager (SMS) as well as the Radio manager system. <br> | ||
By entering into the radio manager system a player may select | By entering into the radio manager system a player may select an additional channel to use for communications in addition to the standard channels available through vanilla Arma. | ||
</p> | </p> | ||
<h3 class="guidelines">Donator Perks</h3> | <h3 class="guidelines">Donator Perks</h3> | ||
<p class="guidelines"> | <p class="guidelines"> | ||
The Donator Perks button is only available to players donating to the 77th | The Donator Perks button is only available to players donating to the 77th JSOC through our [https://www.patreon.com/77th_jsoc Patreon]. <br> | ||
The Perks | The Perks are strictly cosmetic and are available for donators to customize their appearance on foot, in ground vehicles and in air assets. <br> | ||
By pressing the Donator Perk button the player will enter into the Donator perk system and will be able to access the available cosmetics. <br> | By pressing the Donator Perk button the player will enter into the Donator perk system and will be able to access the available cosmetics. <br> | ||
For a full list of available Donator perks and any changes, please check the corresponding [https://77th-jsoc.com/forum/viewtopic.php?f=5&p=27747 forum post]. | For a full list of available Donator perks and any changes, please check the corresponding [https://77th-jsoc.com/forum/viewtopic.php?f=5&p=27747 forum post]. | ||
| Line 685: | Line 718: | ||
<h3 class="guidelines">Leaderboard</h3> | <h3 class="guidelines">Leaderboard</h3> | ||
<p class="guidelines"> | <p class="guidelines"> | ||
Since the 77th | Since the 77th JSOC's primary focus is team-based gameplay, we strongly believe individual scorekeeping is irrelevant; all that matters is how well all players work together to achieve common goals.<br> | ||
To this end, the leaderboard is disabled and will not display any scores for players on the server. | To this end, the leaderboard is disabled and will not display any scores for players on the server. | ||
</p> | </p> | ||
| Line 693: | Line 726: | ||
The visibility button will grant you access to the visibility menu, in this menu, you will be able to see the FPS you had when you opened the menu. <br> | The visibility button will grant you access to the visibility menu, in this menu, you will be able to see the FPS you had when you opened the menu. <br> | ||
There is a restart counter on this page, this, however, is disabled and does not show the correct restart time. <br> | There is a restart counter on this page, this, however, is disabled and does not show the correct restart time. <br> | ||
There | There are options to set individual view, object, shadow and grass draw distances for being on foot, in-ground/aquatic vehicles, helicopters or jets. | ||
</p> | </p> | ||
| Line 699: | Line 732: | ||
<p class="guidelines"> | <p class="guidelines"> | ||
The Options button will grant players some specific options to change their gameplay. <br> | The Options button will grant players some specific options to change their gameplay. <br> | ||
The stamina option is disabled and there is no way to turn | The stamina option is disabled and there is no way to turn off stamina on the 77th JSOC servers. <br> | ||
The weapons sway slider allows the players to | The weapons sway slider allows the players to customize the amount of weapons sway they will endure when playing. <br> | ||
For increased realism and more hardcore game experience, the First-person option will lock a player in the first-person mode when the button is selected, the effect will remain for 15 minutes after the first-person option is disabled. <br> | For increased realism and more hardcore game experience, the First-person option will lock a player in the first-person mode when the button is selected, the effect will remain for 15 minutes after the first-person option is disabled. <br> | ||
The squad radar button will enable a squad radar in the lower part of the screen, this radar will display other members of the | The squad radar button will enable a squad radar in the lower part of the screen, this radar will display other members of the player's squad within a specific distance. This will help any player with their situational awareness and is a good aid when specific formations are used during movement. <br> | ||
The ambient life button will disable or enable ambient life shown for the player, this may help individuals with FPS issues since the removal of ambient life will reduce the amount of objects the computer needs to render. <br> | The ambient life button will disable or enable ambient life shown for the player, this may help individuals with FPS issues since the removal of ambient life will reduce the amount of objects the computer needs to render. <br> | ||
The dynamic simulation button is disabled, this is a server-side setting and selecting this button will not affect the player | The dynamic simulation button is disabled, this is a server-side setting and selecting this button will not affect the player or the server. | ||
</p> | </p> | ||
[http://www.77th-jsoc.com/wiki1/77th_JSOC_/_Public_Servers_/_Guidelines back to top]<br> | [http://www.77th-jsoc.com/wiki1/77th_JSOC_/_Public_Servers_/_Guidelines back to top]<br> | ||
| Line 718: | Line 751: | ||
<hr> | <hr> | ||
<h2 class=" | <h2 class="guidelines">Magazine Repack</h2> | ||
<p class="guidelines"> | |||
Players are able to repack their half-empty magazines by pressing "ALT" + "R". | |||
</p> | |||
[http://www.77th-jsoc.com/wiki1/77th_JSOC_/_Public_Servers_/_Guidelines back to top]<br> | |||
<hr> | |||
<h2 class="guidelines">Parachute Pack</h2> | |||
<h3 class=" | <p class="guidelines"> | ||
<p class=" | To facilitate the possibility to perform parachute operations without reducing the carrying capacity of a player there is a Parachute pack system implemented on the 77th JSOC servers.<br> | ||
There are two ways to find our servers on ArmA 3. | This system will allow players to drop from a rotary or fixed-wing aircraft with a parachute and once upon landing retain their backpack with all gear still in it.<br> | ||
servers.<br> Second and usually faster way is searching by IP | </p> | ||
Note that the second way of finding our servers is faster, but it will | |||
<p class="guidelines"> | |||
''''' To use the Parachute Pack the player in question needs to:'''''<br> | |||
1: Enter into a transport helicopter/aircraft with their backpack on their back.<br> | |||
2: Switch their backpack with one of the parachutes available in the helicopter/aircraft.<br> | |||
3: Not switch seats in the vehicle during the transport to the dropzone.<br> | |||
4: Egress the helicopter/aircraft at their designated dropzone and use the parachute to safely land at their LZ.<br> | |||
5: When you safely land with your parachute, you will automatically regain your backpack and all items inside of it.<br> | |||
</p> | |||
<p class="guidelines"> | |||
Note: If the inventory space of the helicopter/aircraft is insufficient for all backpacks a player outside may empty the vehicle inventory of the backpacks. As long as the players that have switched their backpacks for parachutes do not switch seats inside, they will still have their gear when landing at the LZ. | |||
</p> | |||
[http://www.77th-jsoc.com/wiki1/77th_JSOC_/_Public_Servers_/_Guidelines back to top]<br> | |||
<hr> | |||
<h1 class="guidelines">General Information</h1> | |||
<h2 class="guidelines">Public Servers Information</h2> | |||
<h3 class="guidelines">Public Servers IP Address</h3> | |||
<p class="guidelines"> | |||
There are two ways to find our servers on ArmA 3. The first one is using the keywords which will list all of our Public | |||
servers.<br> Second and usually faster way is searching by IP address. | |||
Note that the second way of finding our servers is faster, but it will show one server at a time. | |||
</p> | </p> | ||
<h4 class=" | <h4 class="guidelines">Finding the servers using keywords</h4> | ||
<p class=" | <p class="guidelines"> | ||
This manner is quite straightforward and can be achieved by doing as follows: <br> | This manner is quite straightforward and can be achieved by doing as follows: <br> | ||
<ol class=" | <ol class="guidelines"> | ||
<li>Proceed to the multiplayer tab in ArmA 3</li> | <li>Proceed to the multiplayer tab in ArmA 3</li> | ||
<li>Clear your filters, make sure the type drop-down menu is empty and set the passworded option to 'Hide'</li> | <li>Clear your filters, make sure the type drop-down menu is empty and set the passworded option to 'Hide'</li> | ||
| Line 739: | Line 804: | ||
</p> | </p> | ||
<h4 class=" | <h4 class="guidelines">Finding the servers using our physical IP-address</h4> | ||
<p class=" | <p class="guidelines"> | ||
As stated previously, this is generally a faster way of finding the servers which can come in handy after server | As stated previously, this is generally a faster way of finding the servers which can come in handy after the server | ||
restarts.<br> However this option is limited to only one server showing up and can be achieved as follows: | restarts.<br> However this option is limited to only one server showing up and can be achieved as follows: | ||
<ol class=" | <ol class="guidelines"> | ||
<li>Open the multiplayer tab in ArmA 3</li> | <li>Open the multiplayer tab in ArmA 3</li> | ||
<li>Navigate to the bottom right option stating 'Remote'</li> | <li>Navigate to the bottom right option stating 'Remote'</li> | ||
<li>In the remote screen you enter the IP | <li>In the remote screen you enter the IP address for the server you want to search for</li> | ||
<ul> | <ul> | ||
<li><em style="font-weight:bold"> 77th JSOC - EU1 - Tactical Community : public1.77th-jsoc.com</em></li> | <li><em style="font-weight:bold"> 77th JSOC - EU1 - Tactical Community : public1.77th-jsoc.com</em></li> | ||
<li><em style="font-weight:bold"> 77th JSOC - EU2 - Tactical Community : public2.77th-jsoc.com</em></li> | <li><em style="font-weight:bold"> 77th JSOC - EU2 - Tactical Community : public2.77th-jsoc.com</em></li> | ||
</ul> | </ul> | ||
<li>Hit the 'OK' button and the server | <li>Hit the 'OK' button and the server of your choosing should show up</li> | ||
</ol> | </ol> | ||
</p> | </p> | ||
<h3 class=" | <h3 class="guidelines">TeamSpeak Information</h3> | ||
<p class=" | <p class="guidelines"> | ||
In order to enhance inter-squad communications and communications between different layers of command we have a | In order to enhance inter-squad communications and communications between different layers of command we have a | ||
public Teamspeak server available to all players making use of our ArmA 3 services.<br> | public Teamspeak server available to all players making use of our ArmA 3 services.<br> | ||
We appreciate you following our set up standards in order to keep the server clean. The address to our Teamspeak | We appreciate you following our set-up standards in order to keep the server clean. The address to our Teamspeak | ||
server is <em style="font-weight:bold">ts.77th-jsoc.com</em>.</p> | server is <em style="font-weight:bold">ts.77th-jsoc.com</em>.</p> | ||
<p class=" | <p class="guidelines"> | ||
Once you join our servers you will be welcomed in our Lobby, we appreciate if you do not stay there over 1 | Once you join our servers you will be welcomed in our Lobby, we appreciate it if you do not stay there over 1 | ||
minute. | minute. | ||
While waiting for a slot on the ArmA 3 server you are welcome to wait in the Lounge area or the Lounge of your | While waiting for a slot on the ArmA 3 server you are welcome to wait in the Lounge area or the Lounge of your | ||
| Line 772: | Line 837: | ||
</p> | </p> | ||
<h2 class=" | <h2 class="guidelines">Which mods are allowed on our servers?</h2> | ||
<p class=" | <p class="guidelines"> | ||
We allow a small set of modifications to be used on our public servers to enhance the gameplay. These mods can be | We allow a small set of modifications to be used on our public servers to enhance the gameplay. These mods can be | ||
found by following [https://77th-jsoc.com/forum/viewtopic.php?f=62&t=3548 this] link. The link provided will | found by following [https://77th-jsoc.com/forum/viewtopic.php?f=62&t=3548 this] link. The link provided will | ||
| Line 781: | Line 846: | ||
in our modpacks. | in our modpacks. | ||
<h2 class=" | <h2 class="guidelines">Help us help you! Anything to report?</h2> | ||
<p class=" | <p class="guidelines"> | ||
We recently implemented a way for all players to report | We recently implemented a way for all players to report misbehavior directly to our available admins. That way, if you happen to be experiencing troubles with another player, trolls disrupting gameplay or any other factor that keeps you from enjoying your time on our servers, you can use the "!report" feature in the side chat. (for example: !report JohnDoe is intentionally teamkilling on EU1)</p> | ||
<p class=" | <p class="guidelines"> | ||
The available admin will be prompted with your message and will be able to intervene quickly and restore balance to the servers. We want all players to be able to play the game in all serenity without having to be harassed. | The available admin will be prompted with your message and will be able to intervene quickly and restore balance to the servers. We want all players to be able to play the game in all serenity without having to be harassed. | ||
</p> | </p> | ||
<p class=" | <p class="guidelines"> | ||
Needless to say, abuse or unfounded reports will be punishable. We implement this feature for the sake of all players and sacrifice the time of our admins | Needless to say, abuse or unfounded reports will be punishable. We implement this feature for the sake of all players and sacrifice the time of our admins as well, therefore we urge all players to only report with founded reasons. | ||
</p> | </p> | ||
[http://www.77th-jsoc.com/wiki1/77th_JSOC_/_Public_Servers_/_Guidelines back to top]<br> | [http://www.77th-jsoc.com/wiki1/77th_JSOC_/_Public_Servers_/_Guidelines back to top]<br> | ||
<hr> | <hr> | ||
</div> | </div> | ||
Latest revision as of 10:17, 28 July 2023
77th JSOC
Welcome to the 77th JSOC wiki. We are a Tactical Realism Unit focused on ArmA 3, with members from all around the globe. Our goal is to promote teamwork and a realistic combat environment. We want to give everyone a chance to enjoy a MilSim experience on our public server. The 77th JSOC cares about all members of the community and if you want to be part of it keep in mind that you should follow the rules we've established on our servers. If you are interested in the private aspect of our unit take a look around when we have recruitment open and join us on multiple custom-written operations and missions.
Guides
Beginners Guide
Initial Connection
The first thing one should do when first joining the server is to get your loadout fixed.
We highly recommend spending some time going over what items you want to take into the battlefield.
Keep it specific to the role you are playing.
If you do not know what accessories are fit for your role we advise you to have a look at the role guide section first.
You will be able to find a recommended loadout for every role available. We appreciate it if you keep it as realistic as possible, which will add a lot to the gameplay itself.
All arsenals at the base will provide a standard loadout for all classes available on the server. Depending on the slot you selected when joining the server you will be able to pick the green class name corresponding to your role in the arsenal. This will automatically equip a loadout suitable for your role.
If you want to pick a more personalized loadout you will be able to use the arsenal to choose your own gear.
Keep in mind a lot of equipment is class-specific, to help you understand what gear is available to what class we have created a player class restriction list, use the restriction list as a reference to ease your gear selection.
Once you have finished making your loadout, make sure you save it in the arsenal. That way, when or if you die, disconnect or reconnect at another point in time, you will be able to quickly load your inventory.
Finally, you head towards the assignment sign so the acting HQ or pilots know you are available.
Getting assigned to a squad or seeking members yourself?
In the case of a person acting as the Commanding Officer (CO) or Headquarters (HQ), you move to the assignment sign and state that you are seeking
a squad or want to create one and he will assign you one once he has the time.
Keep in mind that an HQ has a heavy workload and it can take some time before he is able to find you a suitable squad.
When there is no HQ on the server, wait at the assignment sign until a pilot finds the time to assign you to a squad or give you a squad name.
Know that being proactive will get you to the battlefield a lot quicker than just passively waiting at the base, pilots or HQ may be busy, so just remind them that you need a squad or want to create one.
Once you are assigned to a squad, there are two options to join it:
1: You either will receive an invitation from the squad leader.
(When you receive an invitation, a pop-up will appear on your screen with the name of the person who invited you and asks you to press and hold 'U' to accept the invitation).
2: You can join an open squad yourself.
(To manually join a squad you need to open the squad menu by pressing the "U" key and then manually select and press join for the squad you are assigned to).
If you are creating a new squad, open your squad manager system (SMS) by pressing 'U' and creating a new squad. You may then invite the players assigned to your squad via the same system.
Once you are part of a squad or leading a squad, line up at your squad's sign at the base. (The small signs with Alpha to Hotel on them).
Getting deployed to the AO
Once you are part of a squad and have lined up at the correct squad sign it's time to get yourself into the action and get deployed to the AO.
To do this will differ depending on what situation you are in and what role you have in your squad.
If you are the squad leader of your squad, you need to use the command channel and call for transport from HQ/Pilots, state what squad you are and how many members you have that need a lift and where you
want to go.
HQ/Pilots will then organize the necessary transport and tell you what asset you are assigned for the transport to the AO.
If you are a squad member and your squad is at the base, line up at the squad sign with your fellow squad mates and wait for your Squad leader to arrange a lift for you out to the AO.
When transport is arranged, your Squad leader will tell you where to go for transport to the AO.
If you are a squad member and your squad is already deployed to the AO, line up at your squad sign and inform your Squad leader that you are awaiting transport to their location.
Your Squad lead will then contact HQ/Pilots and arrange a lift for you to the AO, when this is done, your Squad leader will tell you to what asset you are to head for transport to the AO.
Guidelines that may help you along the way
Squad sizes
First of all, we should make a clear distinction between different types of squads. There is a difference between an infantry squad, mortar squad or armor crew. Those minimum requirements have to be met and respected in order to be deployed.
- Infantry
An infantry squad consists of a bare minimum of six players. A squad always needs a squad leader, in addition to this it is highly recommended that there is one medic and one anti-tank rifleman in order to be effective. The remaining three roles can be adjusted to the needs of the mission at hand.
- Armour
An armor crew consists of three players in order to be functional. The roles consist of a squad leader who will be in the commanding seat issuing the orders, a driver and a gunner. Either the driver or the gunner should preferably have the role of an engineer in order to salvage the vehicle if it gets damaged by the enemy. Be advised, an armor squad can only be granted by an acting HQ.
- Mortar
Before deploying to the AO, a squad wishing to use Mortars needs to ask for permission from HQ. Without HQ, mortars are not allowed to be deployed.
A mortar team has the same squad size requirement as any other infantry squad. Contrary to popular belief, a mortar squad does not standardly operate with a vehicle, they are foot mobile.
A mortar unit will be regarded as artillery and falls under the same ROE as the base artillery.
By default, a mortar squad should include one squad leader, one mortar gunner, and two carriers who also perform perimeter security. It is up to the squad leader to decide if there is any rotation whilst holding the position.
Communications
Communication is key, not only in battle but also when you find yourself at the base. To ensure proper communications we have set up standards we expect all players to uphold. In general, every player is allowed to use all the different channels to chat (i.e.: using side to find a squad). However, we would appreciate it if you keep it to the point. For voice transmissions (VOIP) we have the following standards and rules set up.
- Side channel
When used for voice communications this channel is reserved for 77th JSOC members or the person who is acting as HQ. Since transmitting over the side channel gets broadcasted for every player on the server we strongly advocate the HQ to minimize the chatter on this channel and refrain from using it unless deemed necessary. Any player abusing this might be removed from the server after repeated infractions. The side channel is a good place to type questions regarding the servers/gameplay as anyone logged on to the server is able to see the question and answer.
- Command channel
This channel is used by the players who are either HQ, pilots, UAV-operator or squad leaders. Its sole purpose is to effectively communicate between the several layers of command and to request insertions, extractions, CAS strikes and the like.
- Group channel
The group channel is used by anyone who is in your squad at that moment. You can not communicate with anyone outside of it. You are able to communicate with unit members regardless of the distances between each of you.
- Vehicle channel
It is good practice to switch to a vehicle channel whenever you are mounting one. This channel permits you to communicate with all others within the same vehicle. This can come in handy when you want to communicate with a driver or a transport pilot.
- Direct channel
Lastly, the direct channel will mostly be used at the base or when you want to communicate with another squad nearby on the battlefield itself. This is the least powerful channel and the further away you are from the person you are talking to, the weaker the sound will get. At base, it is frequently used to recruit personnel to join squads.
Guidelines of Communication
- When sending a message over the command channel, the sender should always start with identifying the receiver followed by their own identity
- To reduce radio traffic, all voice communications should be as short as possible
- Voice communications should always be to the point and have a clear message that is easy to understand by the receiver
- Communication procedure: [Request] –> [Contact] -> [Message] -> [Ending]
- Keep all channels clean for good communication between players.
- Only one person can speak on the command channel at a time.
- You can request communication with all elements on the command channel.
- The end of channel use should always be clear for other elements.
Extraction after completion of the objective
The extraction of a squad after the completion of the objective is requested by the squad leader.
Be advised, the extracting pilot reserves the right to leave a squad behind when they either shoot at the extracting copper or he deems there is abuse of the smoke signals.
Only the squad leader is allowed to signal extraction with blue smoke.
Personnel who place mines near the extraction site risk being removed from the servers as there is no viable reason to do so after all threats have been eliminated. If one does and damages the extraction vehicle that person will be temporarily removed from the game for a set amount of time from all our services. We do not tolerate any form of damage to NATO equipment.
Usage of smoke grenades
In order to have a more realistic and immersive experience, we expect the following guidelines to be respected:
*Only the squad leader is allowed to carry blue smoke. This color will be used for extraction purposes only.
*All other members are allowed to use either green, red or white smoke.
*If red smoke gets purposely thrown on friendly units the person having thrown that smoke risks getting removed from our servers.
It should be noted that excessive smoke spam at an LZ is regarded as trolling.
-
Blue smoke : Used to signal extraction (only to be used by the squad leader)
-
White smoke : Used to cover a visual line of sight to either get in cover safely or retrieve downed members
-
Green smoke : Used to mark friendly positions to avoid blue-on-blue fire
-
Red smoke : Used to mark enemy positions.
Basic formations
Formation - A formation is defined as an arrangement. The way something, in this case, members of a squad, are arranged or coming together. The end goal of keeping formations lies in working together as a single entity, providing cover and keeping sectors cleared so the integrity of the unit can be guaranteed.
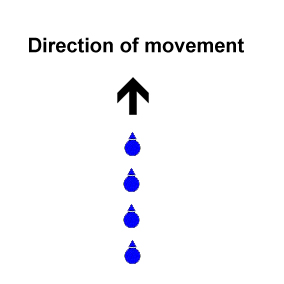
Column
http://www.77th-jsoc.com/wiki1/images/column.jpg
A column is frequently used in non-combat situations when moving towards a set point over the mainland. Whilst this formation is one of the most frequently used, goal of it gets misused even more. If one wants to make optimal use of this formation it is of the utmost importance to keep sectors.
The first person in line always keeps the sector right in front while navigating towards the objective. The second person chooses and vocalizes whether he is taking the left or right side relative to the person in front. All soldiers who follow will take the opposite side of the person in front of him, while ultimately the last person checks the rear from time to time to make sure no one can creep up behind.
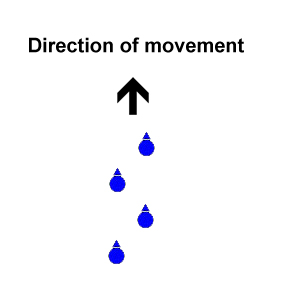
Staggered Column
http://www.77th-jsoc.com/wiki1/images/staggered-column.jpg
A staggered column is frequently used in non-combat situations when moving towards a set point in urban areas or along main roads. This will also be used when escorting vehicles towards a set objective, having the vehicle drive between both columns.
Moving as two separate staggered columns, the leftmost column will keep the left sector clear while the rightmost column keeps the right sector clear. Just like a normal column, the persons in the back of the formation keep check of the rear so no enemies can creep up on them.
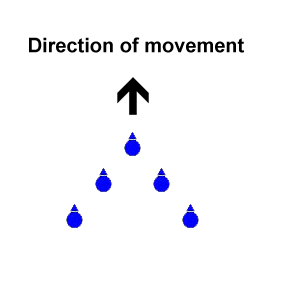
Wedge
http://www.77th-jsoc.com/wiki1/images/wedge.jpg
The wedge or arrow formation is commonly used when moving through an open field while under fire or when starting an assault from an elevated position toward a set objective. This formation provides when used correctly almost 180° coverage in the direction you are moving. Just as in all other formations the last person makes sure the rear end stays clear from enemies.
Echelon
http://www.77th-jsoc.com/wiki1/images/echelon.jpg
Echelon or staircase formation is most frequently used on steep terrain differences like moving up a mountain in which the use of other formations is inefficient. It is in essence the leftmost or rightmost half of a wedge. Where sectors are being kept on par with the wedge formation.
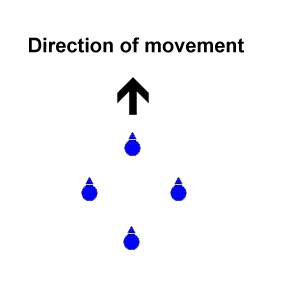
Diamond
http://www.77th-jsoc.com/wiki1/images/diamond.jpg
The Diamond formation is often used when escorting a high-value target(HVT). This formation is less frequently used, but when used correctly it will provide 360° coverage. Each member covers the sector relative to his position within the diamond.
Line
http://www.77th-jsoc.com/wiki1/images/line.jpg
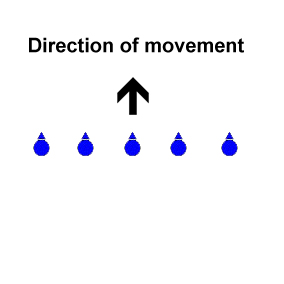
A line or walking line formation is either used when suppressing fire from an elevated position or when you need maximum firepower in one direction. Also proven handy to sweep areas of dense cover. The main responsibility of the soldiers on the outer flanks is to prevent enemies from flanking or creeping up behind the squad.
Combat movement
Combat tactics when moving towards an objective or when retreating from hot areas to provide a maximum amount of safety and therefore ensure a minimum amount of casualties whilst being on the move.
Bounding
The bounding tactic is a combat maneuver frequently used to safely reach your objective when there is not much cover and when you want to keep maximum firepower at all times.
This tactic consists of one fireteam bounding to a certain point, once that fireteam is set, the second overwatching fireteam 'bounds' up to the first fireteam's location. Which allows a maximum amount of firepower if troops come into contact with enemies. This movement gets repeated until the full squad reaches its destination.
Alternate Bounding a.k.a. Leapfrogging
The tactic of alternating movement of coordinated units to allow, if necessary, suppressive fire in support of offensive forward movement or defensive disengagement.
In essence, a fireteam takes up an overwatch position whilst the other members advance to cover. These two fireteams continuously switch roles toward their objective. This allows the overwatch position to suppress enemy fire when necessary.
The difference between normal bounding and leapfrogging lies in the fact that the leapfrogging tactic overtakes the overwatch position instead of halting at the overwatching fireteam.
Medical procedures
Next to the squad leader and fireteam lead the combat lifesaver (CLS) is the most important role a squad member can fulfill. Therefore it is imperative not to take big risks but rather stay behind the other members in order to provide medical assistance when someone gets injured or killed in action(KIA). It is a smart thing to task other members of the squad in retrieving downed members to safety so the CLS can do his job.
In light of keeping tactical realism to a high standard, it is NOT allowed to respawn when one dies. When you decease on the battlefield it is imperative to let the timer run and give your squad members the chance to drag or carry you into safety so the medic can perform his magic upon you, since briefly put, if you die, you must have done something wrong. Frequently, casualties are sustained when not being able to keep sectors, letting enemies creep up on you, not using hard cover to your advantage and so on. Therefore we explicitly ask you NOT to respawn.
Be advised that, if you however do respawn for whichever reason other than disconnection, you will be demoted to the lowest priority to link back up to your squad. This means, if pilots have other tasks at hand, they will stay at base until other tasks have been completed before getting reunited with their squad on the battlefield. Unless you are the squad leader or medic there will be no exceptions made.
As a CLS it is essential to wait with performing medical assistance until the casualty has been dragged and dropped completely, or, carried and touched the ground. When trying to revive while the animation is still being executed this can result in a so-called 'bugged' player. If you are experiencing a carry bug, the solution is: Press ESC --> Respawn (ONCE) --> Medic revive. There are NO legitimate reasons to kill a friendly.
Clearing of buildings
While this might be standard for most players, it is one of the deadliest maneuvers when not carried out correctly. When breaching any kind of building or structure it is imperative the breaching squad communicates clearly on each member's tasks.
While stacking up in anticipation of breaching it is a smart thing to reload a fresh magazine, make sure your weapon's fire rate is set to burst or automatic, keep on covering sectors to avoid getting flanked by roaming enemies and wait until all members are ready to breach. Whilst this seems like the most basic of things, missing out on one of the previous measures can have catastrophic consequences for the whole team.
The breaching process:
While one member opens the door, the first man in or 'breacher' proceeds to move inside the structure neutralizing all enemy contacts in the frontal sector. The second soldier (who opened the door) immediately follows and calls out 'Clearing left/right depending on that building's layout. The third member takes the opposite side for his account whilst vocalizing his sector. A fourth member will cover the entrance unless explicitly told otherwise by the person in charge.
Situational awareness
Situational awareness is the perception of environmental elements with respect to time or space, the comprehension of their meaning and the projection of their status after some variable has changed. Or, in simpler words, being aware of what happens in your surroundings and possessing the ability to adapt to unforeseen circumstances.
Situational awareness is a state that should always be kept regardless of combat situation, even at base when waiting for a squad it might come in handy to understand what is going on on the servers at that moment in time. The HQ or pilots might be otherwise engaged at which point it makes no sense in pushing or pressuring people to prioritize themselves over the overall situation at hand.
Critical thinking helps out improving your situational awareness on the battlefield. Putting yourself in the enemy's shoes and questioning if I were the enemy, where would I station myself? Where would I fire from? How can I flank the enemy without them spotting me? These are basic examples that can help you raise your overall awareness.
Keeping sectors at all times and being able to adapt to the evolving situation improves situational awareness as well. Knowing that, if you keep a sector that is not taking fire at that particular moment in time but your team member on the opposite side of your formation is, you don't need to change facing towards his sector unless explicitly told to do so. If you do however change your sector you are weakening your formation and giving the enemy the opportunity to attack the weakest link.
Abbreviations and definitions
|
| ||||||||||||||||||||||||||||||||||||||||||||||||||||||||||||||||||||||||||||||||||||||||||||||||||||||||||||||||||||||||||||||||||||||
Server Specific Systems
Squad Management System (SMS)
The SMS allows you to rename your squad to your liking and manage the personnel in your fire team. Checking the 'private' option will lock your squad so members can only join upon invitation. Keep in mind that persons joining the server in the same fire team as the squad leader will automatically join that squad (this is due to the roles that are chosen within the role assignment upon joining the server), this can easily be changed by kicking that person out of your fire team.
Pressing 'U' without having received an invitation will open up the Squad Management System. This is a tool that displays all active squads, shows the personnel currently in it and shows you who is still squad-less or without a group. If you receive an invitation from a squad leader you can confirm that invitation by pressing and holding 'U'.
Scrolling through the SMS tool is done by pressing the up/down arrow keys or the page up/page down keys.
Player Menu
The Player Menu or Client Menu is a menu enabling the players to adjust some aspects of their game/gameplay and access the Donator Perks on the 77th-JSOC servers.
To access the menu players must first press ESC, then select the "Player Menu" option.
On top of the menu, you will be able to see your health and total load, this will help you to determine if you are injured or overburdened.
The following options are available through the Player Menu:
1: Comm-Link.
2: Donator Perks.
3: Leaderboard.
4: Visibility.
5: Options.
Comm-Link
Through the Comm-Link button, players may access links to different 77th JSOC social media platforms, website, forums and donation links.
Players may also access the Group manager/Squad manager (SMS) as well as the Radio manager system.
By entering into the radio manager system a player may select an additional channel to use for communications in addition to the standard channels available through vanilla Arma.
Donator Perks
The Donator Perks button is only available to players donating to the 77th JSOC through our Patreon.
The Perks are strictly cosmetic and are available for donators to customize their appearance on foot, in ground vehicles and in air assets.
By pressing the Donator Perk button the player will enter into the Donator perk system and will be able to access the available cosmetics.
For a full list of available Donator perks and any changes, please check the corresponding forum post.
Leaderboard
Since the 77th JSOC's primary focus is team-based gameplay, we strongly believe individual scorekeeping is irrelevant; all that matters is how well all players work together to achieve common goals.
To this end, the leaderboard is disabled and will not display any scores for players on the server.
Visibility
The visibility button will grant you access to the visibility menu, in this menu, you will be able to see the FPS you had when you opened the menu.
There is a restart counter on this page, this, however, is disabled and does not show the correct restart time.
There are options to set individual view, object, shadow and grass draw distances for being on foot, in-ground/aquatic vehicles, helicopters or jets.
Options
The Options button will grant players some specific options to change their gameplay.
The stamina option is disabled and there is no way to turn off stamina on the 77th JSOC servers.
The weapons sway slider allows the players to customize the amount of weapons sway they will endure when playing.
For increased realism and more hardcore game experience, the First-person option will lock a player in the first-person mode when the button is selected, the effect will remain for 15 minutes after the first-person option is disabled.
The squad radar button will enable a squad radar in the lower part of the screen, this radar will display other members of the player's squad within a specific distance. This will help any player with their situational awareness and is a good aid when specific formations are used during movement.
The ambient life button will disable or enable ambient life shown for the player, this may help individuals with FPS issues since the removal of ambient life will reduce the amount of objects the computer needs to render.
The dynamic simulation button is disabled, this is a server-side setting and selecting this button will not affect the player or the server.
Earplugs
To reduce the noise of the ambient sounds and vehicles a player may use Earplugs, the earplugs are togglable using the "END" key.
Magazine Repack
Players are able to repack their half-empty magazines by pressing "ALT" + "R".
Parachute Pack
To facilitate the possibility to perform parachute operations without reducing the carrying capacity of a player there is a Parachute pack system implemented on the 77th JSOC servers.
This system will allow players to drop from a rotary or fixed-wing aircraft with a parachute and once upon landing retain their backpack with all gear still in it.
To use the Parachute Pack the player in question needs to:
1: Enter into a transport helicopter/aircraft with their backpack on their back.
2: Switch their backpack with one of the parachutes available in the helicopter/aircraft.
3: Not switch seats in the vehicle during the transport to the dropzone.
4: Egress the helicopter/aircraft at their designated dropzone and use the parachute to safely land at their LZ.
5: When you safely land with your parachute, you will automatically regain your backpack and all items inside of it.
Note: If the inventory space of the helicopter/aircraft is insufficient for all backpacks a player outside may empty the vehicle inventory of the backpacks. As long as the players that have switched their backpacks for parachutes do not switch seats inside, they will still have their gear when landing at the LZ.
General Information
Public Servers Information
Public Servers IP Address
There are two ways to find our servers on ArmA 3. The first one is using the keywords which will list all of our Public
servers.
Second and usually faster way is searching by IP address.
Note that the second way of finding our servers is faster, but it will show one server at a time.
Finding the servers using keywords
This manner is quite straightforward and can be achieved by doing as follows:
- Proceed to the multiplayer tab in ArmA 3
- Clear your filters, make sure the type drop-down menu is empty and set the passworded option to 'Hide'
- Enter '77th JSOC' in the name box and hit 'OK'
Finding the servers using our physical IP-address
As stated previously, this is generally a faster way of finding the servers which can come in handy after the server
restarts.
However this option is limited to only one server showing up and can be achieved as follows:
- Open the multiplayer tab in ArmA 3
- Navigate to the bottom right option stating 'Remote'
- In the remote screen you enter the IP address for the server you want to search for
- 77th JSOC - EU1 - Tactical Community : public1.77th-jsoc.com
- 77th JSOC - EU2 - Tactical Community : public2.77th-jsoc.com
- Hit the 'OK' button and the server of your choosing should show up
TeamSpeak Information
In order to enhance inter-squad communications and communications between different layers of command we have a
public Teamspeak server available to all players making use of our ArmA 3 services.
We appreciate you following our set-up standards in order to keep the server clean. The address to our Teamspeak
server is ts.77th-jsoc.com.
Once you join our servers you will be welcomed in our Lobby, we appreciate it if you do not stay there over 1 minute. While waiting for a slot on the ArmA 3 server you are welcome to wait in the Lounge area or the Lounge of your desired server. If you happen to be AFK we highly recommend jumping down to our AFK channel which is accessible to all players, infractions on those rules might result in a kick from our Teamspeak servers.
Which mods are allowed on our servers?
We allow a small set of modifications to be used on our public servers to enhance the gameplay. These mods can be found by following this link. The link provided will navigate you to a topic on our forums and in order to view the topic you must be registered on our forum-services. We highly recommend making use of this topic in order to stay up to date with the latest changes in our modpacks.
Help us help you! Anything to report?
We recently implemented a way for all players to report misbehavior directly to our available admins. That way, if you happen to be experiencing troubles with another player, trolls disrupting gameplay or any other factor that keeps you from enjoying your time on our servers, you can use the "!report" feature in the side chat. (for example: !report JohnDoe is intentionally teamkilling on EU1)
The available admin will be prompted with your message and will be able to intervene quickly and restore balance to the servers. We want all players to be able to play the game in all serenity without having to be harassed.
Needless to say, abuse or unfounded reports will be punishable. We implement this feature for the sake of all players and sacrifice the time of our admins as well, therefore we urge all players to only report with founded reasons.